Importing Demos
The demo importer allows you to import any of the demos seen on the demo site with one click. This is the easiest way to setup your site because it will allow you to quickly edit everything instead of creating templates from scratch. The demo data imports templates, posts, pages, categories, media and menus. It will not overwrite your existing content.
- Go to GhostPool Core > Import Demos.
- Hover over the demo you want to import and click the Select button to open the import popup window.
- The window shows all the plugins used in this demo. It is recommend you click the Install or Activate link next to each plugin to fully replicate the demo.
- Below this you will see what demo content is being imported. It is recommend you leave all checkboxes checked to fully replicate the demo.
- Click the blue Import to import the demo content.
- Once the import is complete click the Set as Homepage button to set the demo page as your homepage.
And here’s the video…
Editing Demos
Once you’ve imported the demos you’ll probably want to edit the templates and colors.
Editing Templates
- Go to GhostPool Core > Template Editor.
- Now you can edit any of the templates used in the demo you imported.
Editing Colors
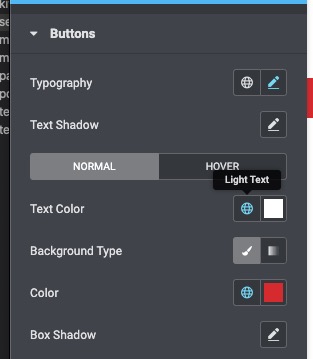
- All colors used by elements in the imported demos such as links, buttons, backgrounds etc can be changed globally from GhostPool Core > Settings > Style > Global Colors.
- Changing these colours will change any element in the theme using them.
- You can overwrite the global colors and instead change colors for individual elements. Press the back button at the top of the Global Colours menu to change the colors for the major areas of the theme.
- By default you will see each color has a blue globe icon next it, hovering over it shows what global color it is using. You can either select a different global color or set a color just for this element.

- To edit the colors for individual templates, such as the colors of a review box, go to GhostPool Core > Template Editor.
- Find the template you want, hover over the link and click Edit with Elementor link.
- Now click on the specific element you want to edit and from the left select the global color or individual color you want to use.
Uninstalling Demos
You can either uninstall individual demos or uninstall all demos at once.
Uninstall Individual Demos
- Go to GhostPool Core > Import Demos.
- Hover over the demo you want to uninstall and click the Select button to open the import popup window.
- Check the Uninstall Demo checkbox and then click the Uninstall button.
- Click OK when prompted by the confirmation box.
Uninstall All Demos
- Go to GhostPool Core > Import Demos.
- Scroll down to the bottom of the page and check the demo content checkboxes you want to uninstall.
- Click the Delete button.
- Click OK when prompted by the confirmation box.
Manual Import
If the demo importer is not working for you, you can import the demos manually. The demo files are located in the theme under magzine/demo-files/
Once in the demo-files folder you’ll see folders for each of the theme demos. Within each demo folder you’ll see one or more of the following:
- templates.xml – imports the demo templates
- terms.xml – imports the demo categories, tags etc.
- media.xml – imports the demo logos and ad images
- pages.xml – imports the demo pages
- posts.xml – imports the demo posts
- products.xml – imports the WooCommerce products
- menus.xml – imports the demo menus
- site-settings.txt – imports the demo site settings
- display-conditions.txt – imports the demo display conditions
- attributes.txt – imports the demo attributes
- wpforms.json – importd demo contact forms
- levels.txt – importd thedemo PMPro membership levels
- bp-fields.txt – imports thedemo BuddyPress profile fields
- bp-fields.txt – imports thedemo BuddyPress profile search forms
Importing Templates, Terms, Posts, Pages, Products and Menus
- Go to Tools > Import in your WordPress admin dashboard.
- Find the WordPress option and click Install Now (if it’s not already installed) or Run Importer.
- Click Choose File and then select the desired XML file.
- Click the Upload File and import button.
- Select the admin user from the dropdown menu check the Download and import file attachments option.
- Now do the same for the other XML files.
Importing Site Settings
- Go to the GhostPool Core > Tools, find the Import Site Settings option and click Choose File and then select the site-settings.txt file.
- Click the Import Site Settings button.
- Click the Save Changes button to import the theme options.
Importing Display Conditions
- Go to the GhostPool Core > Tools, find Import Display Conditions option and click Choose File and then select the display-conditions.txt file.
- Click the Import Display Conditions button.
- Click the Save Changes button to import the style settings.
Importing Attributes
- Go to the GhostPool Core > Tools, find the Import Attributes option and click Choose File and then select the attributes.txt file.
- Click the Import Attributes button.
- Click the Save Changes button to import the attributes.
Importing WPForms
- Install and activate the WPForms plugin.
- Go to WPForms > Tools > Import.
- Click Choose File and then select the desired wpforms.json file.
- Click the Import button.