Help File: Socialize
- 1.0 Getting Started
- 1.1 Downloading The Theme
- 1.2 Installation
- 1.3 Installing Packaged Plugins
- 1.4 Installing Recommended Plugins
- 1.5 Importing Demo Data
- 1.6 Updating The Theme
- 1.7 Updating The Plugins
- 1.8 Basic Troubleshooting
- 2.0 WPBakery Page Builder
- 3.0 Creating Pages
- 4.0 Theme Sections
- 5.0 Styling Your Site
- 6.0 Translating The Theme (Localisation)
- 7.0 Advanced
1.0 Getting Started
1.1 Downloading The Theme
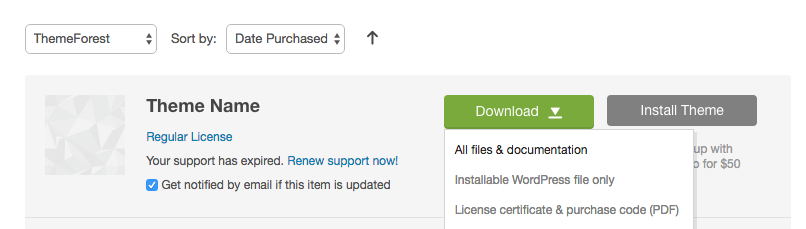
Go to your ThemeForest Downloads page, locate the theme, click the green Download button and select the All files & documentation option.
Unzip the file once it has downloaded and you will now see a folder called socialize-theme. Within this folder you will see the following:
- Help/ - Help file and changelog
- PSDs/ - Any layered theme images in PSD form
- socialize.zip - A zip of the theme you would upload via the WordPress admin panel
1.2 Installation
Before installing the theme make sure you have installed WordPress 4.9 or higher. You can download WordPress for free from WordPress.org.
There are two ways to install the theme, please choose the one that best suits you:
1.2.1 Installing Through WordPress Admin Panel
- Log in to the WordPress Admin Panel.
- Go to Appearance -> Themes.
- Click the Add New button.
- Finally click the Upload Theme button and upload socialize.zip (NOT socialize-theme.zip).
If the theme is too large to be uploaded you will need to increase the upload limit as explained here. Alternatively upload the theme via FTP as described below.
1.2.2 Installing Through FTP
If the theme is too large to be uploaded through the WordPress admin panel you should upload the theme through an FTP client instead.
To set up an FTP client refer to the WordPress documentation on this http://codex.wordpress.org/FTP_Clients.
Once you have set up your FTP client upload the socialize folder to your WordPress themes directory wp-content/themes/ (this is in inside the socialize-theme folder if you downloaded the full theme download).
1.2.3 Activating the theme
Once you have installed the theme you should activate the theme by going to Appearance -> Themes and clicking the Activate link below the Socialize theme. You will then be directed to the welcome page where you can activate theme updates, install required/optional plugins and import the demo data.
1.3 Installing Packaged Plugins
If you didn't install/active the required and/or recommended plugins from the welcome page go to Appearance -> Install Plugins and select all the required and recommended plugins and select Activate from the dropdown menu.
You cannot manually update the premium plugins (e.g. WPBakery Page Builder) that come with the theme unless you have purchased them separately. If these plugins have been updated you will need to wait until a new theme update is released which will include these plugin updates.
1.3 Installing Required & Recommended Plugins
Once you have installed and activated the theme you will need to activate the packaged plugins if they haven't been activated automatically. Go to Appearance -> Install Plugins and select all the required and recommended plugins and select Activate from the dropdown menu.
You cannot manually update the premium plugins (e.g. WPBakery Page Builder) that come with the theme unless you have purchased them separately. If these plugins have been updated you will need to wait until a new theme update is released which will include these plugin updates.
1.4 Installing Recommended Plugins
A number of plugins have been designed to work with the theme and are used in the theme demo.
Autoptimize
Autoptimize makes optimizing your site really easy. It concatenates all scripts and styles, minifies and compresses them, adds expires headers, caches them, and moves styles to the page head and can move scripts to the footer. It also minifies the HTML code itself, making your page really lightweight. There are advanced options and an extensive API available to enable you to tailor Autoptimize to each and every site's specific needs.
bbPress
bbPress is forum software with a twist from the creators of WordPress. Easily setup discussion forums inside your WordPress.org powered site.
BuddyPress
BuddyPress helps you build any type of community website using WordPress, with member profiles, activity streams, user groups, messaging, and more.
The Events Calendar
Create an events calendar and manage it with ease. The Events Calendar plugin provides professional-level quality and features backed by a team you can trust.e.
Super Socializer
Allows your visitors to login using their existing social accounts IDs. This has been integrated into the theme's popup modal login window.
1.5 Importing Demo Data
You can import the demo data so your site looks like the theme demo. This is the easiest way to setup your theme. It will allow you to quickly edit everything instead of creating content from scratch. The demo data imports posts, pages, categories, media, widgets and menus. It will not overwrite your existing content or modify any WordPress settings.
1.5.1 Importing Demo Data
To add the demo data follow the step below:
- Go to Appearance -> Socialize Setup and click the Import Demo Data tab.
- BuddyPress Activity, Groups and Members seen in the demo will NOT be imported. You can import dummy BuddyPress data using the BuddyPress Default plugin.
1.5.2 Removing Duplicate Demo Data
Reimporting the demo data will not duplicate posts, pages, images etc if they have already have been imported, however menu items will be duplicated. If you want to remove these go to Appearance -> Menus and manually delete the duplicate links. You can quickly remove them using the Quick remove menu item plugin.
1.5.3 Removing All Demo Data
If you want to remove all the demo data you imported there are two ways to do this:
- WordPress Reset plugin: This plugin is the fastest way to get rid of content. However, it will remove all posts, pages, menus, images, widget data, theme options, etc from your website, not just the demo data. It does not remove plugins, but will deactivate them. Only use this plugin if you are able to start over.
- Manual removal: This method will take longer and simply involves manually deleting all of imported posts, pages, menus, images etc.
1.6 Updating The Theme
1.6.1 Activating Update Notifications
In order to receive update notifications you need to do the following:
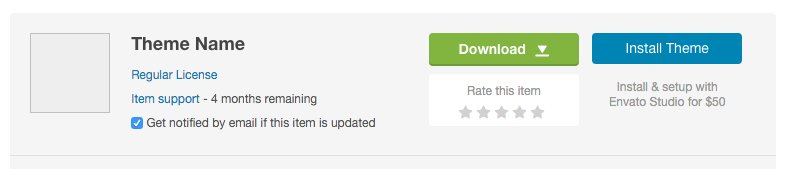
- Go to your ThemeForest Downloads page and find this theme.
- Check the Get notified by email if this item is updated option as shown in the image below.
1.6.2 Automatic Theme Updates
If you have made changes to the parent theme files you should not use automatic theme updates and refer to the Manual Theme Update section below.
To update the theme automatically do the following:
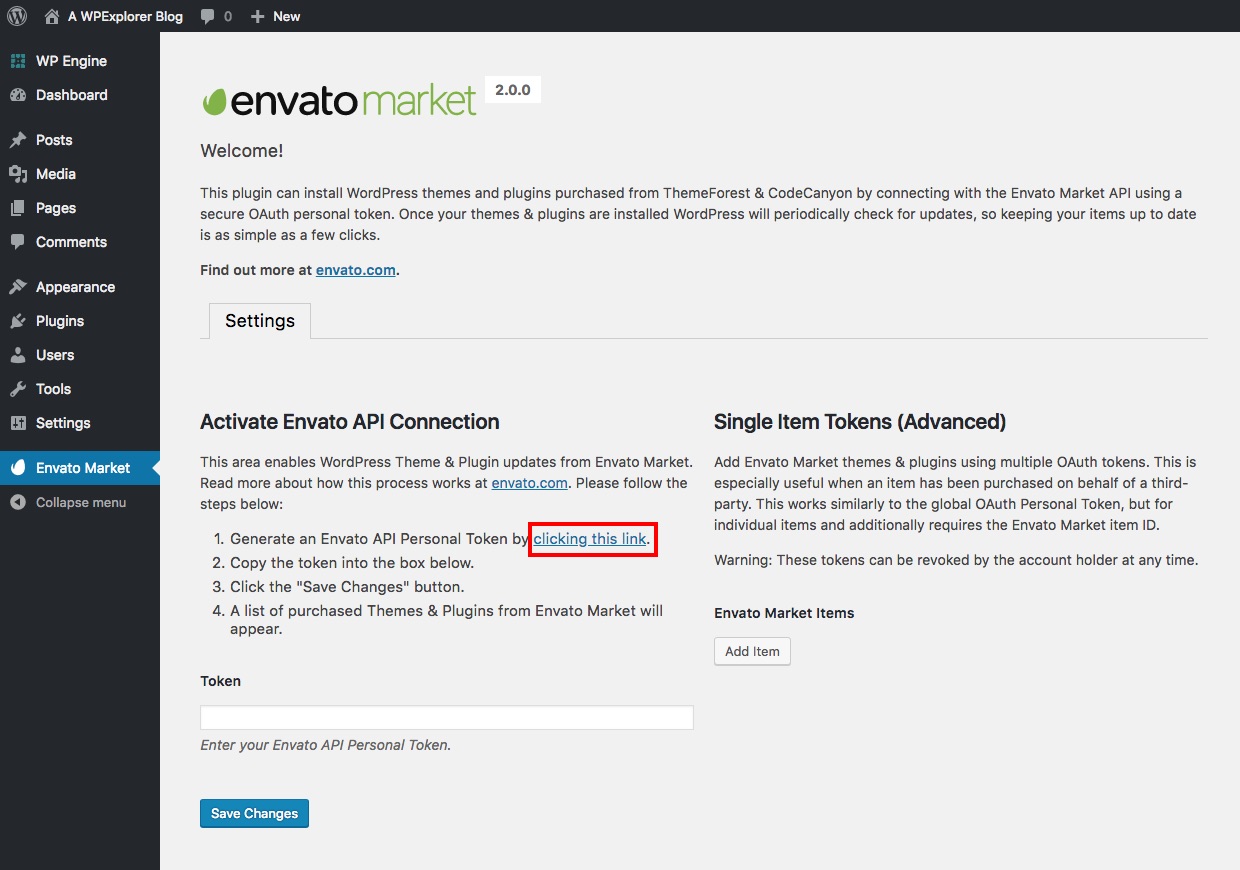
- Go to Appearance > Install Plugins and install the Envato Market WordPress plugin or download the plugin here and then upload it from Plugins > Add New > Upload Plugin.
- Next click on the Envato Market link in your dashboard menu and click on the generate a personal token link to create an Envato API token.
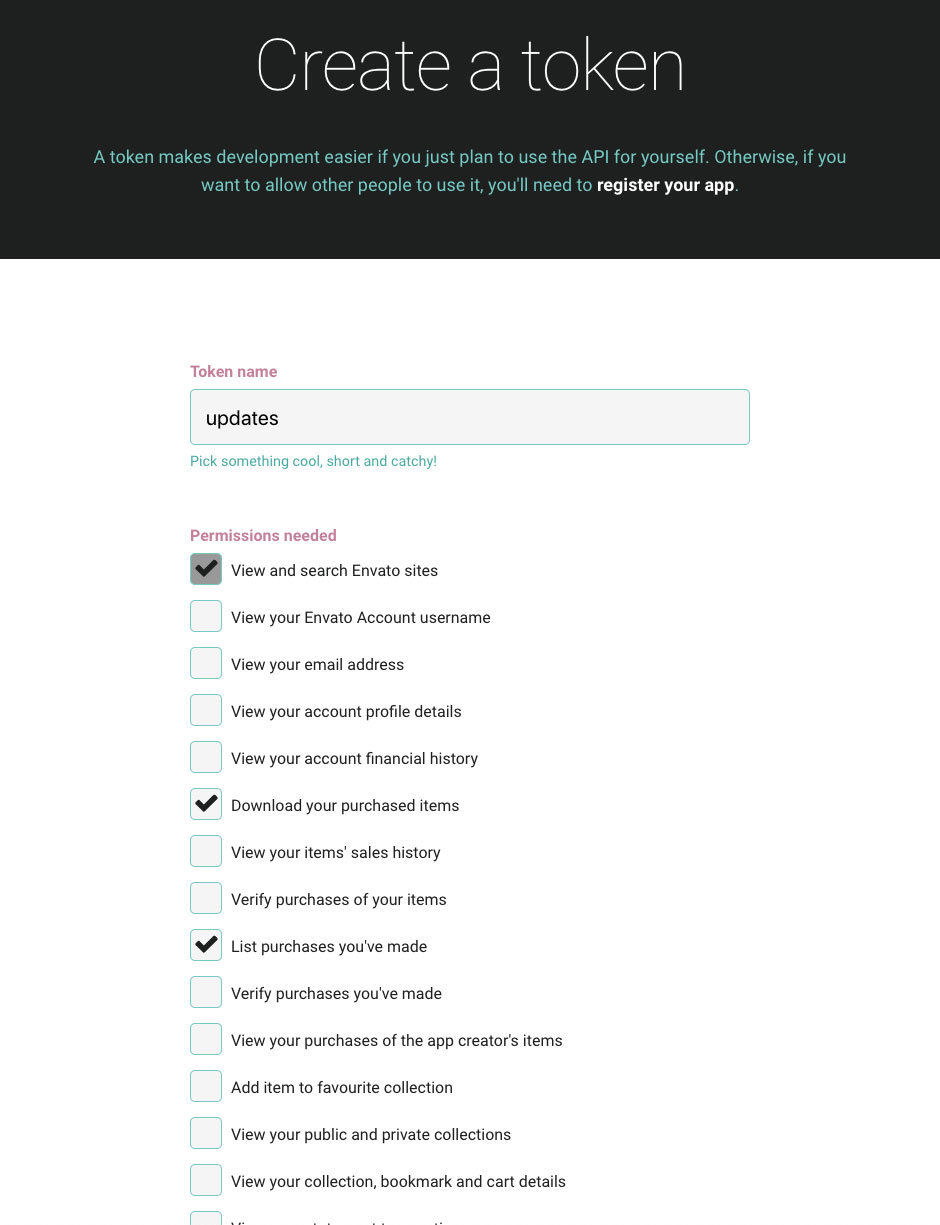
- If you're already logged into your Envato account you'll be taken to the screen below (otherwise you will be prompted to login first before being redirected to this page). On this screen you can see what permissions the Envato Market WordPress plugin requires. Give your token a name, check the box that you have read and agree to the terms and then click the green button to create your token.
- Once your token is created you will see a green success screen. Copy your token code (this is very important since Envato doesn't store a copy of the token for you), check to confirm that you've copied it and click the white button.
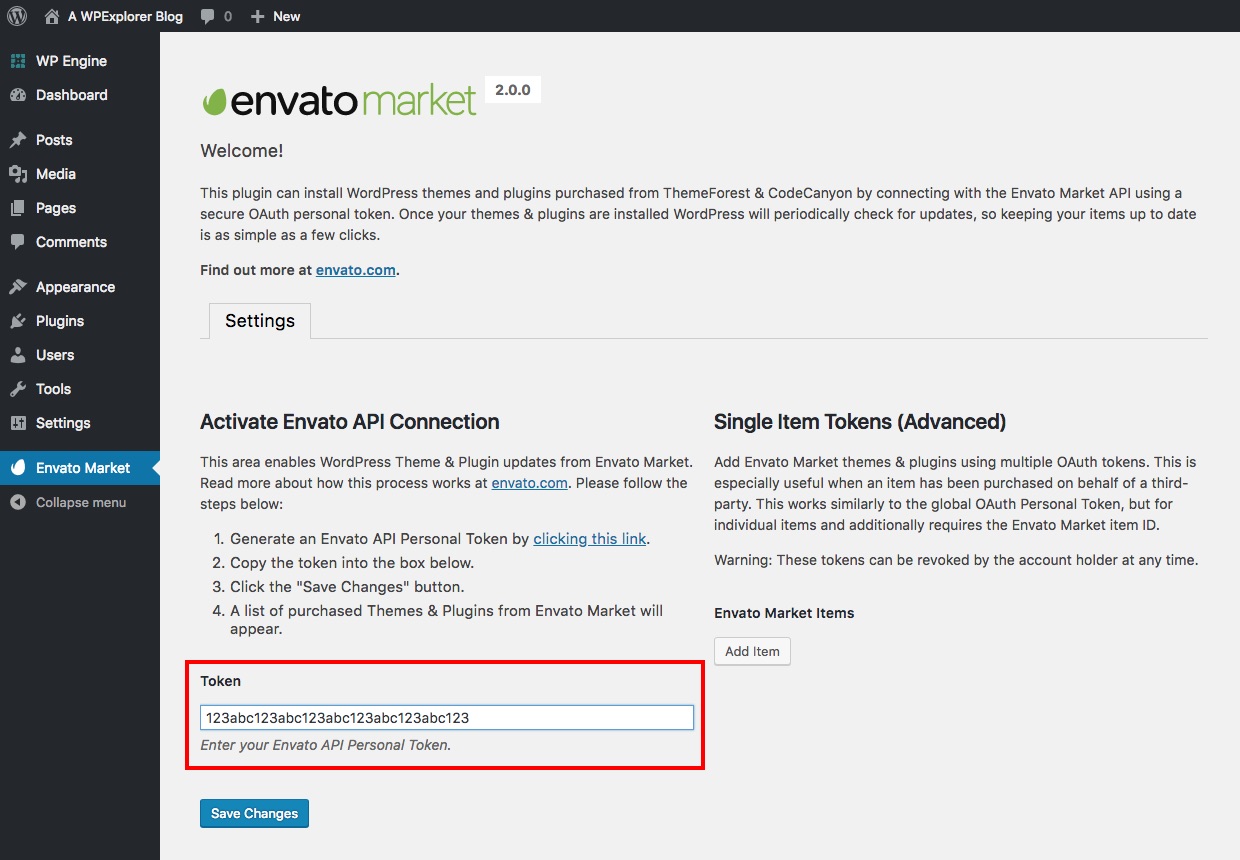
- Now go back to your WordPress installation and add your Envato API token then click Save Changes.
- It's possible that you might see an insufficient permissions notice when you first enter your token. Don't worry, just go back to the previous page and try again. It should work on the second go.
- Once your token is saved and validated the page will refresh to show you all your theme and plugin purchases.
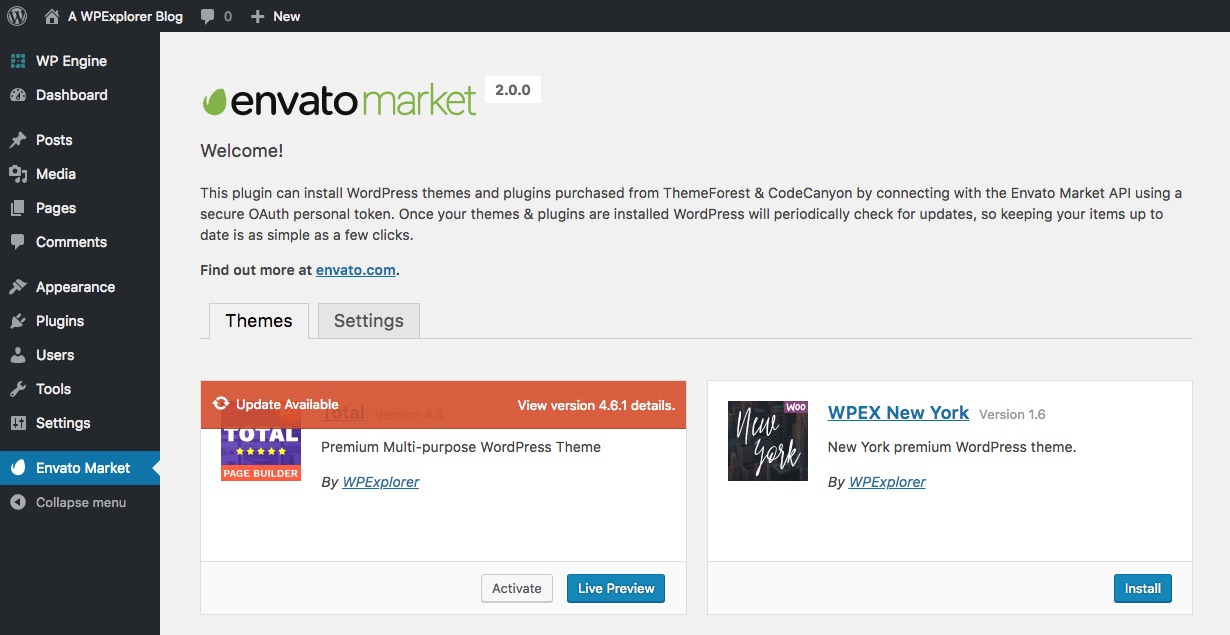
You CANNOT update plugins bundled with the theme using the Envato Market plugin. You can only update plugins you have purchased separately. Plugin updates will be provided within the theme updates.
1.6.3 Manual Theme Update
If you have made changes to the parent theme files you should not use automatic theme updates because your theme file changes will be overwritten (this does not mean changing theme options which is fine). You will need to download the theme from ThemeForest, reapply your modifications and then upload the modified files via an FTP client. In the future it is recommended that you use the Socialize child theme to make changes to the theme so you can update the parent theme without your changes being overwritten. To use the child theme see Using The Child Theme.
If you need to update the theme manually, do the following:
- Go to your ThemeForest Downloads page, locate the theme, click the green Download button and select the Installable WordPress file only option.
- Now go to Appearance > Themes and activate another theme so you can deactivate and delete the Socialize theme.
- Finally click the Add New and upload the zip file you just downloaded and activate the theme.
1.7 Updating The Plugins
Whenever a new version of a plugin is available you will be emailed that the theme has been updated if you activated update notifications as described in the Activating Update Notifications section.
To update the theme plugins do the following:
- First you need to update theme as described in the Updating The Theme section.
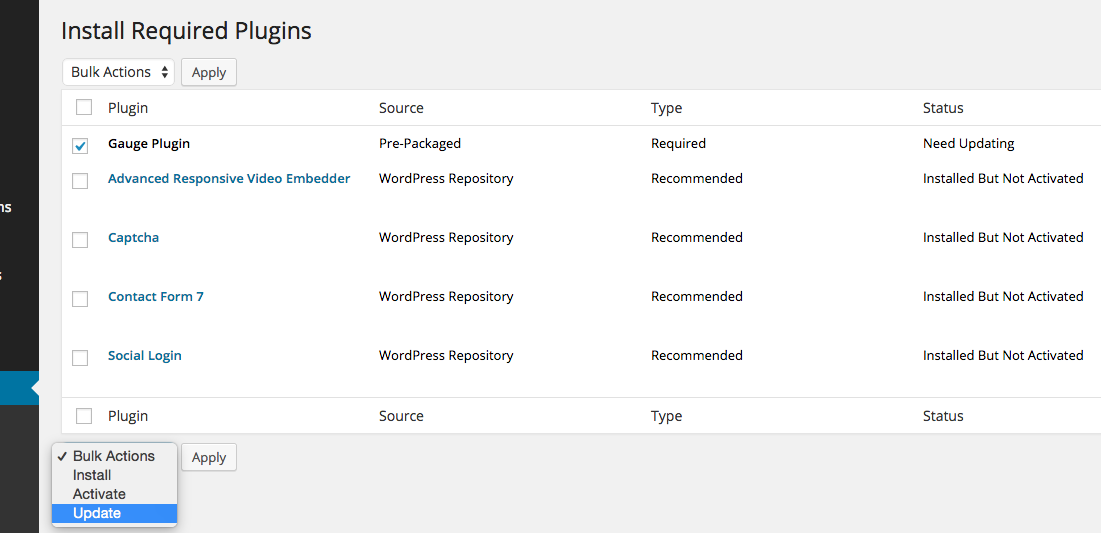
- Now go to Appearance -> Install Plugins and check the plugins that need updating, select Update from drop the dropdown menu and click Apply.
1.8 Basic Troubleshooting
1.8.1 Before contacting support you must do the following...
1. Make sure you are using the latest version of the theme and included plugins
Please update to the latest version of the Socialize theme and included plugins as this will likely fix your theme issues. We will not look at any issues if you haven't updated the theme. The latest version of this theme is shown in the changelog. To find out what version you are using go to your dashboard and find Appearance -> Themes and hover your mouse over the theme thumbnail. Click the Theme Details button and a new window will pop up with the theme version number next to the theme title.
To update the theme see Updating The Theme and to update the included plugins see Updating The Plugins.
2. Deactivate all plugins
If the theme update doesn't resolve the issue disable all activated plugins (except the plugins that are needed to test the issues). If this fixes your issues this means the theme is not causing the issue. Reactivate the plugins one by one or in groups so you can identify which plugins are causing the problem.
3. Switch themes
If deactivating all plugins doesn't resolve the issue, activate the default Twenty Seventeen theme. If the issues still occur this means the theme is not causing the issue and this is a general WordPress or server issue. You will need to contact WordPress support, your web host or hire a developer to fix your issues.
4. WordPress admin access
If this issue is being not caused by a plugin and only occurs on this theme please open a support ticket at https://ghostpool.ticksy.com (if you haven't done so already) and provide me with WordPress admin access so I can look at your issue.1.8.2 I need help but my support license has expired?
If your support license has expired you need to renew it to get theme support. To do this go to the theme item page and click the Renew support button on the right hand side. For more information on renewing your support please click here. Once you've renewed your support you need to post a support ticket at https://ghostpool.ticksy.com.
This may seem unfair if you just have a small question, however there are three reasons for this:
- I receive lots of emails every day asking for free support. All of these emails mount up and I'm essentially spending hours a day working for free.
- Answering questions for free is unfair on the paying customers who renew their support license just to ask a question.
- Most of the time "one simple question" turns into several spin off questions.
1.8.3 I've found a bug but my support license has expired?
If you are reporting a theme bug you do not need to renew your support. However before contacting support you must have tried all the steps in Before contacting support you must do the following....
Once you have confirmed this is a theme bug you can email support here (you must be logged in to see email form).
2.0 WPBakery Page Builder
This theme comes with a full version of the WPBakery Page Builder plugin, which is a drag and drop frontend and backend page builder that will save you tons of time working on our site content.
2.1 WPBakery Page Builder Elements
The theme comes with multiple WPBakery Page Builder elements which are explained below:
2.1.1 Blog Element
The Blog element displays posts, pages and custom post types in a variety of ways. To use the Blog element do as follows:
2.1.1.1 Creating a Blog element
- Create or edit and a page and click the Backend Editor button.
- Click the Add Element button to open the Add Element window and select the Blog element.
- This will insert the Blog element into the page and open up the Blog Settings window where you can choose how the element looks and what content it should display.
- Close the window and then click Publish.
2.1.1.2 Displaying posts from specific categories
- To display posts from a specific category go to Posts -> Categories and create a new category called "Blog" for example - take note of the category slug e.g. "blog". Now add the posts you want to show in the element to this category.
- Go back to the page with the Blog element, hover over the Blog element and click the green pencil icon to open the Blog Settings window again.
- Add the category slug to the Categories text box e.g. "blog" and then click Save Changes. To add multiple categories separate each category slug with a comma.
- Save the page by clicking the Update button and then view the page - you should see a list of posts from the "Blog" category.
2.1.1.3 Displaying specific pages
- To display specific pages go back to the page with the Blog element, hover over the Blog element and click the green pencil icon to open the Blog Settings window again.
- Add the page IDs to the Page IDs text box e.g. "34,78,92".
- Check the "page" checkbox under the Post Types option and click Save Changes.
- Save the page by clicking the Update button and then view the page - you should see those specific pages in a list.
2.1.2 Carousel Element
The Carousel element displays posts, pages and custom post types in a carousel. To use the Carousel element do as follows:
2.1.1.1 Creating a Carousel element
- Create or edit and a page and click the Backend Editor button.
- Click the Add Element button to open the Add Element window and select the Carousel element.
- This will insert the Carousel element into the page and open up the Carousel Settings window where you can choose how the element looks and what content it should display.
- Close the window and then click Publish.
2.1.2.2 Displaying posts from specific categories
- To display posts from a specific category go to Posts -> Categories and create a new category called "Carousel" for example - take note of the category slug e.g. "carousel". Now add the posts you want to show in the element to this category.
- Go back to the page with the Carousel element, hover over the Carousel element and click the green pencil icon to open the Carousel Settings window again.
- Add the category slug to the Categories text box e.g. "carousel" and then click Save Changes. To add multiple categories separate each category slug with a comma.
- Save the page by clicking the Update button and then view the page - you should see a list of posts from the "Carousel" category.
2.1.2.3 Displaying specific pages
- To display specific pages go back to the page with the Carousel element, hover over the Carousel element and click the green pencil icon to open the Carousel Settings window again.
- Add the page IDs to the Page IDs text box e.g. "34,78,92".
- Check the "page" checkbox under the Post Types option and click Save Changes.
- Save the page by clicking the Update button and then view the page - you should see those specific pages in a list.
2.1.3 Portfolio Element
The Portfolio element displays portfolio items in a variety of ways. To use the Portfolio element do as follows:
2.1.3.1 Creating a Portfolio element
- Create or edit and a page and click the Backend Editor button.
- Click the Add Element button to open the Add Element window and select the Portfolio element.
- This will insert the Portfolio element into the page and open up the Portfolio Settings window where you can choose how the element looks and what content it should display.
- Close the window and then click Publish.
2.1.3.2 Displaying portfolio items from specific categories
- To display portfolio items from a specific category go to Portfolio -> Portfolio Categories and create a new category called "Portfolio" for example - take note of the category slug e.g. "portfolio". Now add the portfolio items you want to show in the element to this category.
- Go back to the page with the Portfolio element, hover over the Portfolio element and click the green pencil icon to open the Portfolio Settings window again.
- Add the category slug to the Categories text box e.g. "portfolio" and then click Save Changes. To add multiple categories separate each category slug with a comma.
- Save the page by clicking the Update button and then view the page - you should see a list of portfolio items from the "Portfolio" category.
2.1.4 Showcase Element
The Showcase element displays posts, pages and custom post types in a horizontal or vertical list. To use the Showcase element do as follows:
2.1.4.1 Creating a Showcase element
- Create or edit and a page and click the Backend Editor button.
- Click the Add Element button to open the Add Element window and select the Showcase element.
- This will insert the Showcase element into the page and open up the Showcase Settings window where you can choose how the element looks and what content it should display.
- Close the window and then click Publish.
2.1.4.2 Displaying posts from specific categories
- To display posts from a specific category go to Posts -> Categories and create a new category called "Showcase" for example - take note of the category slug e.g. "showcase". Now add the posts you want to show in the element to this category.
- Go back to the page with the Showcase element, hover over the Showcase element and click the green pencil icon to open the Showcase Settings window again.
- Add the category slug to the Categories text box e.g. "showcase" and then click Save Changes. To add multiple categories separate each category slug with a comma.
- Save the page by clicking the Update button and then view the page - you should see a list of posts from the "Showcase" category.
2.1.4.3 Displaying specific pages
- To display specific pages go back to the page with the Showcase element, hover over the Showcase element and click the green pencil icon to open the Showcase Settings window again.
- Add the page IDs to the Page IDs text box e.g. "34,78,92".
- Check the "page" checkbox under the Post Types option and click Save Changes.
- Save the page by clicking the Update button and then view the page - you should see those specific pages in a list.
2.1.5 Slider Element
The Slider element displays posts, pages and custom post types in a slider. To use the Slider element do as follows:
2.1.5.1 Creating a Slider element
- Create or edit and a page and click the Backend Editor button.
- Click the Add Element button to open the Add Element window and select the Slider element.
- This will insert the Slider element into the page and open up the Slider Settings window where you can choose how the element looks and what content it should display.
- Close the window and then click Publish.
2.1.5.2 Displaying posts from specific categories
- To display posts from a specific category go to Posts -> Categories and create a new category called "Slider" for example - take note of the category slug e.g. "slider". Now add the posts you want to show in the element to this category.
- Go back to the page with the Slider element, hover over the Slider element and click the green pencil icon to open the Slider Settings window again.
- Add the category slug to the Categories text box e.g. "slider" and then click Save Changes. To add multiple categories separate each category slug with a comma.
- Save the page by clicking the Update button and then view the page - you should see posts from the "Slider" category in the slider.
2.1.5.3 Displaying specific pages
- To display specific pages go back to the page with the Slider element, hover over the Slider element and click the green pencil icon to open the Slider Settings window again.
- Add the page IDs to the Page IDs text box e.g. "34,78,92".
- Check the "page" checkbox under the Post Types option and click Save Changes.
- Save the page by clicking the Update button and then view the page - you should see those specific pages in the slider.
2.1.9 Other Element
The theme also comes with a Activity, Advertisement, Groups, Members, Friends, Recently Active Members, Who's Online, Forums Search Form, Forums List, Recent Replies, Recent Topics, bbPress Statistics, Events List, Login/Register Form, Pricing Table, Statistics, Team and Testimonial Slider element which can be inserted into any page.
2.2 WPBakery Page Builder Templates
WPBakery Page Builder templates allow you to automatically insert predefined layouts consisting of WPBakery Page Builder elements into a page. The theme comes with one template called Homepage. To add them to a page do as follows:
- Create or edit and a page and click the Backend Editor button.
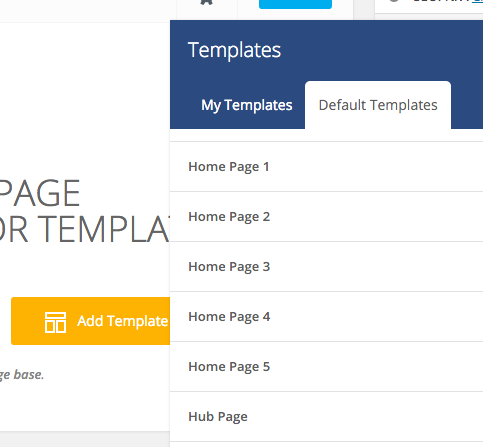
- Click the Add Template button to open the Templates window.
- Click the Default templates tab and select one of the theme templates.
2.3 Adding WPBakery Page Builder Elements In Sidebars
The theme comes with a plugin called Visual Sidebars Editor, if you haven't installed this already please see 1.3 Installing Required & Recommended Plugins. Once installed you can add any WPBakery Page Builder element to your sidebars. To do this do as follows:
- Go to Appearance -> Sidebars Editor and select the sidebar you want to add your elements to from the right hand side.
- Give your sidebar a title and insert your element(s) just as you would with a page and click the Update button.
2.4 Updating WPBakery Page Builder
To receive WPBakery Page Builder plugin updates you will need to wait until a theme update is available which will include the updated version of the plugin. Once you have updated the theme you should see a notice on any page in the WordPress backend with a link that says Begin updating plugin. If you do not see this go to Appearance -> Install Plugins. This will take you to the Install Required Plugins where you will see the WPBakery Page Builder update. Select this plugin and click the Update link.
If you want to automatically update the plugin you will need to purchase the WPBakery Page Builder plugin separately in order to obtain a purchase code.
3.0 Creating Pages
3.1 Homepage
3.1.1 Setting Up Page
- Go to Pages -> Add New to create a new page.
- Give your page a title.
- Click the Backend Editor button and click the Add Template button to open the Templates window.
- Click the Default templates tab and select the Homepage template.
- This will insert the homepage layout into the page - you can customize this by editing each individual section.
- A new section will appear below the text editor called Homepage Options where you can edit the page options (if you can't see this section make sure the page template is set to Homepage).
- Now publish the page.
- To make this page your homepage go to Settings -> Reading, select A static page option and from the Front page drop down menu select the page you just created (leave the Posts page drop down menu empty).
3.1.2 Adding Left Sidebar
- To add content to the left sidebar go to Appearance -> Sidebars Editor give the sidebar a title.
- Click the Add Template button to open the Templates window, click the Default templates tab and select the Left Homepage template.
- Finally select the Homepage Left Sidebar on the right and click the Update button.
3.1.3 Adding Right Sidebar
- To add content to the right sidebar go to Appearance -> Sidebars Editor give the sidebar a title.
- Click the Add Template button to open the Templates window, click the Default templates tab and select the Right Homepage template.
- Finally select the Homepage Right Sidebar on the right and click the Update button.
3.1.4 Editing Slider
- To edit the slider at the top of the page, edit the page you just created and scroll down to the Content Header text box where you should see:
[slider cats="main-slider" format="gp-slider-two-cols" per_page="3" slider_speed="0"]
- To change what posts are displayed in the slider, change
main-sliderto your category slug, this will be the category you have added your posts to, that you want to show in the slider. To add multiple categories separate each category slug with a comma. - To change the slider format, change
gp-slider-two-colstogp-slider-one-col. - If you want to customize the slider further, create a new page and click the Backend Editor button. Click the Add Element button to open the Add Element window and select the Slider element. This will insert the Slider element into the page and open up the Slider Settings window where you can choose how the element looks and what content it should display. Close the window and then click Classic Editor button and copy the shortcode you see. You can now paste this shortcode into the Content Header box when on your homepage.
3.2 Blogs
3.2.1 Creating Blog Posts
To set up a blog page to display all your posts you first need to create some posts as follows:
- Go to Posts -> Add New to create a new post.
- Give your post a title and content in the text editor.
- Scroll down to the Post Options panel where you can control the way the post looks.
- On the right hand side you will see a Featured Image panel, click the Set featured image link to set an image for this post.
- After uploading or selecting your featured image click the Set featured image button in the image upload window.
- On the right hand you can assign your post to categories from the Categories panel e.g. "Blog".
3.2.2 Creating A Blog
- Go to Pages -> Add New to create a new page.
- Give your page a title.
- On the right hand side in the Page Attributes panel select the "Blog" page template from the Template dropdown menu.
- A new section will appear below the text editor called Blog Options where you can change the blog page options.
3.3 Portfolios
3.3.1 Creating Portfolio Items
To set up a portfolio page to display all your portfolio items you first need to create some items as follows:
- Go to Portfolio Items -> Add New to create a new item.
- Give your item a title and content in the text editor.
- Scroll down to the Portfolio Item Options panel where you can control the way the item looks.
- On the right hand side you will see a Featured Image panel, click the Set featured image link to set an image for this post.
- After uploading or selecting your featured image click the Set featured image button in the image upload window.
- On the right hand you can assign your item to categories from the Portfolio Categories panel e.g. "Music".
- These categories will be used as portfolio filters on portfolio pages.
To add WPBakery Page Builder support to portfolio items go to WPBakery Page Builder -> Role Manager and under Post types check the gp_portfolio_item option.
3.3.2 Creating A Portfolio
- Go to Pages -> Add New to create a new page.
- Give your page a title.
- On the right hand side in the Page Attributes panel select the "Portfolio" template from the Template dropdown menu.
- You can control the all the portfolio page options by going to Theme Options -> Portfolios -> Portfolio Categories.
3.4 Categories
You can create post categories. Posts assigned to these categories are then displayed on these category pages on your site. You can add, edit and view categories as follows:
- Go to Posts > Categories and either create or edit an existing category. You can view the categories you have created by hovering your mouse over the category name and clicking the View link.
- To edit existing categories hover your mouse over the category name and click the Edit link. You can also edit a variety of options on this page including page header background, category colour, page layout etc.
4.0 Theme Sections
4.1 Header
4.1.1 Changing The Logo
- Go to Theme Options -> Header and find the Desktop Logo and Mobile Logo options.
- Click the Upload buttons to upload or use an image from your media library.
- For retina support make your logos double the width and height you want to display them at, you can then specify the logo dimensions in the options.
4.2 Navigation Menus
4.2.1 Creating Menus
- Go to Appearance -> Menus to set up your navigation menus.
- Click the Manage Locations tab to view all the navigation areas in the theme. You can create a menu for each navigation area or use the same menu multiple times.
4.2.2 Menu Types
You can create six different menu types:
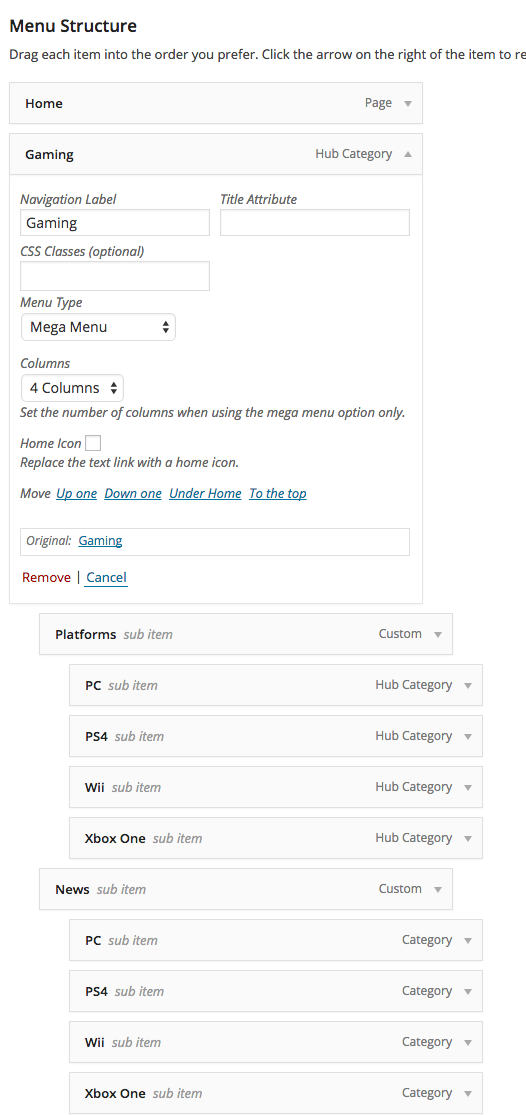
4.2.2.1 Mega Menus
- Go to Appearance -> Menus and add or edit an existing menu item.
- Select "Mega Menu" from the Menu Type dropdown menu.
- You can also choose the number of columns and define each mega menu column by dragging the menu items you want in each column inwards and underneath the parent link as shown in the image below.
4.2.2.2 Content/Tab Content Menus
- Go to Appearance -> Menus and add or edit an existing category menu item (this will only work with category menu items).
- Select "Content Menu" or "Tab Content Menu" from the Menu Type dropdown menu.
4.2.2.3 Login, Register, Logout and Profile Menus
- Go to Appearance -> Menus and from the Custom Links tab create a new link.
- Set the URL to "#", add the desired link text and click Add to Menu.
- Once created select "Login Link", "Register Link", "Logout Link" or "Profile Link" from the Menu Type dropdown menu to create the desired link.
- The different link types do as follows:
- A login link opens the login modal window.
- A register links open the registration modal window or redirects to the BuddyPress registration page if activated.
- A logout link logs the current user out.
- A profile link shows the current logged in user's name and the BuddyPress notifications counter if activated. Clicking the name goes to author page or BuddyPress profile page if activated. Clicking the notifications counter goes to the notifications page. To add dropdown links for Friends, Messages, Settings etc. add these links as dropdown items as you would with ordinary links from the BuddyPress panel on the left hand side. If you can't see the BuddyPress panel, click the Screen Options button in the top right corner of the page and check the BuddyPress option.
4.2.3 Device Display
To control whether a menu link is shown on all devices, only large devices or only mobile devices do as follows:
- Go to Appearance -> Menus and add or edit an existing menu item.
- Select the desired option from the Device Display dropdown menu.
4.2.4 Logged In/Out Display
To control whether a menu link is shown for all users, only logged in or out users do as follows:
- Go to Appearance -> Menus and add or edit an existing menu item.
- Select the desired option from the Logged In/Out Display dropdown menu.
4.2.5 Hide Navigation Title/Label
To hide the text for a menu link, for example if you just want to show an icon, do as follows.
- Go to Appearance -> Menus and add or edit an existing menu item.
- Check the Hide Navigation Label checkbox.
4.2.6 Menu Icons
To add icons next to your navigation links do as follows:
- Go to Appearance -> Menus and add or edit an existing menu item.
- In the Icon text box add an icon class name e.g fa-search. The full list of icon class names are available here.
![]()
4.2.7 Menu Text
To add text to your menus do as follows:
- Go to Appearance -> Menus and create a custom link (this will not work on first level links).
- Add your text to Navigation Label text box.
- Finally select "Menu Text" from the Content dropdown menu.
4.2.8 Menu Images
To add images to your menus do as follows:
- Go to Appearance -> Menus and create a custom link (this will not work on first level links).
- Add your image URL to URL text box and add a title in the Navigation Label text box.
- Finally select 'Menu Image" from the Content dropdown menu.
4.3 Sidebars
The sidebar area is used to display widgets. To create a new sidebar and assign it to a page do as follows:
- Go to Appearance -> Sidebars, click the Add Sidebar link and give your new sidebar a name.
- Now go to the desired page and scroll down to the settings panel and select one of your sidebars from the Sidebar drop down menu.
- To change the sidebar on all posts, pages, categories, products etc. this can be done from Theme Options page.
- Now go to Appearance -> Widgets and drag and drop widgets from the Available Widgets panel over to the widget areas on the right.
4.4 Footer
The footer comes in two sections. The first section contains the footer widgets. The second section contains the copyright text. To set up both sections do as follows:
4.4.1 Setting Up The Footer Widgets
- Go to Appearance -> Widgets and drag and drop widgets from the Available Widgets panel over to the five footer widget areas on the right.
- Each footer widget area represents a new column in the footer
4.4.2 Setting Up Copyright Text
- To replace the default copyright text, go to Theme Options -> Footer add your own text in Copyright Text text box.
5.0 Styling Your Site
5.1 Style Settings
With this theme you can style every element of the site as follows:
- Go to Theme Options -> Styling.
- Simply change the colors using the color picker or input your own color code.
- Click the Save Changes after you have finished editing this section.
5.2 Page Background
- Go to Appearance -> Background to add your own background color or upload your own background image.
5.3 Customizing The Theme
5.3.1 Using The Child Theme
This theme comes with a child theme called Socialize Child. A child theme inherits the functionality of another theme, called the parent theme, and allows you to modify, or add to, the functionality of that parent theme. A child theme is the safest and easiest way to modify an existing theme. Whenever you update the parent theme any changes you have made to the child theme will not be overwritten. To install the child theme do as follows:
5.3.1.1 Installing Child Theme
- Go to Appearance -> Socialize Setup, click the Theme Addons tab.
- Locate the Socialize Child Theme and click Activate child theme.
5.3.1.2 Custom CSS Styling
If you want to change the appearance of the theme e.g. background colour, font size, font family etc. - everything CSS controls, you can change this from Theme Options > Styling in most cases. For more specific or advanced changes you will need to add your own CSS code to your child style.css file.
5.3.1.3 Overriding Templates
All the files in the socialize root directory and socialize/lib/sections/ directories can be overridden in your child theme.
For example if you add a modified copy of page.php to your socialize-child theme folder the site will use this version instead. In the future when you update the parent theme your version of page.php will not be removed. If you want to modify files in socialize/lib/sections/, create the same directory structure in your child theme, socialize-child/lib/sections/ and upload the modified files to it.
In some cases it will be necessary to modify your child template files when updating the theme, for example if page.php uses a function name that has been changed in the parent theme. Such changes will be noted in the changelog, which you should read prior to updating the theme.
5.3.1.4 Overriding Functions And Filters
Files that cannot be overridden, such as those in the socialize/lib/inc/ directory contain functions and filters which can be added to your child functions.php file to override the parent theme functionality. If you want to edit a file, open the file in your text editor and look for any functions and filters you can override.
Overriding Functions
Open socialize/lib/inc/init-variables.php and you will see the following:
if ( function_exists( 'ghostpool_custom_init_variables' ) ) {
	ghostpool_custom_init_variables();
}
This is a function that allows you to insert your code into the file at this particular point.
So you can add the following to your child functions.php file to load your own variables instead:
function ghostpool_custom_init_variables() {

    // Custom page template
    if ( is_page_template( 'custom-template.php' ) ) {
        $GLOBALS['ghostpool_title'] = 'gp-large-page-header';
        $GLOBALS['ghostpool_layout'] =  'gp-no-sidebar';
        $GLOBALS['ghostpool_sidebar'] = 'gp-standard-sidebar';
    }

    // Custom post type
    if ( is_singular( 'custom_post_type' ) ) {
        $GLOBALS['ghostpool_title'] = 'gp-large-page-header';
        $GLOBALS['ghostpool_layout'] =  'gp-no-sidebar';
        $GLOBALS['ghostpool_sidebar'] = 'gp-standard-sidebar';
    }

    // Attachment page
    if ( is_attachement() ) {
        $GLOBALS['ghostpool_title'] = 'gp-large-page-header';
        $GLOBALS['ghostpool_layout'] =  'gp-no-sidebar';
        $GLOBALS['ghostpool_sidebar'] = 'gp-standard-sidebar';
    }

}
Overriding Filters
Open socialize/lib/inc/login-settings.php and you will see the following:
echo apply_filters( 'ghostpool_redirect_filter', '<script data-cfasync="false" type="text/javascript">window.location.reload();</script>', $gp_user_data );
This is a filter which allows you to change the value of <script data-cfasync="false" type="text/javascript">window.location.reload();</script> in your child theme.
So in your child theme functions.php file add:
function ghostpool_login_redirect( $gp_redirect, $gp_user_data ) {
    $gp_redirect_link = bp_members_get_user_url( $gp_user_data->ID );
    $gp_redirect = '<script data-cfasync="false" type="text/javascript">window.location.replace("' . $gp_redirect_link . '");</script>';
    return $gp_redirect;
}
add_filter( 'ghostpool_redirect_filter', 'ghostpool_login_redirect', 10, 2 );
5.3.1.5 Including Files in Your Child Theme
When you need to include files that reside within your child theme you will use get_stylesheet_directory(). For example add the following to your child functions.php file:
require_once( get_stylesheet_directory() . '/my_included_file.php' );
5.3.2 Custom CSS Settings
You can also add your custom CSS code from the theme options, however this is limited as you cannot edit the template files like you can with a child theme. To add your custom CSS code do the following:
- Go to Theme Options -> Styling and add your CSS code to the CSS Code text box.
5.3.3 Developer Tools
An excellent way of editing your theme is to use the developer tools that come with most modern browsers. The developer tools allow you to see what HTML elements need to be styled and allows you to edit the styling of the theme within the browser window. These changes are not permanent and nobody else sees them, it's just a great way of adjusting the look of your site quickly. Here are some links to the developer tools for each of the major browsers:
- Google Chrome - Inspect Element Tool
- Firefox - Firebug Tool
- Safari - Developer Tools
- Internet Explorer 9 - F12 Developer Tools
6.0 Translating The Theme (Localisation)
The theme is localisation ready so all that is needed is your translation. This documentation covers two methods to create your translation. The easiest method is to use a plugin called Loco Translate and more advanced users can use Poedit.
6.1 Loco Translate
6.1.1 Translation
- To set your default site language go to Settings -> General and select your language from the Site Language dropdown menu.
- Go to Plugins -> Add New, search for "Loco Translate" and install and activate the plugin.
Translating the theme
- Go to Loco Translate -> Themes, select the Socialize theme (if you're using a child theme make sure you select the parent theme) and click the New language link.
- This will take you to a page where you can choose the language and location. Select the language that matches the one you selected from Settings -> General and set the location to "System".
- Once you've done this you can translate the theme.
Translating the plugin
Some of the theme text, such as WPBakery Page Builder elements is included in Socialize plugin.
- Go to Loco Translate -> Plugins, select the Socialize Plugin and click the New language link.
- This will take you to a page where you can choose the language and location. Select the language that matches the one you selected from Settings -> General and set the location to "System".
- Once you've done this you can translate the theme.
6.1.2 Updating Your Translation
If you update the theme and new text needs to be translated you also need to update the language file as follows:
- For the theme go to Loco Tranlsate -> Themes, select the Socialize theme and edit your language file.
- For the plugin go to Loco Tranlsate -> Plugins, select the Socialize Plugin and edit your language file.
- Click the Sync button to load all the new text from .pot translation file to your language file (.po).
6.2 Poedit
6.2.1 Translation
- To set your default site language go to Settings -> General and select your language from the Site Language dropdown menu.
- Install and open the translation program Poedit.
Translating the parent theme
- Go to File -> New From POT/PO File and open the translation file from socialize-theme/socialize/languages/socialize.pot.
- You will be asked to specify the language you want to translate to.
- Now click on each string and enter your translation in the text box.
- After translating the strings save your file. The filename should be prefixed with "socialize" followed by the country code, so a Norwegian translation will be saved as socialize-nb_NO.po.
- PoEdit will create a .po and .mo file containing your translations. Upload these files to wp-content/languages/themes/.
Translating the child theme
- Add the following code to your child theme's functions.php file (this has already been added in newer versions):
function ghostpool_child_theme_language() { $language_directory = get_stylesheet_directory() . '/languages'; load_child_theme_textdomain( 'socialize', $language_directory ); } add_action( 'after_setup_theme', 'ghostpool_child_theme_language' ); - Next create a languages folder (this has already been added in newer versions) in your child theme directory and copy socialize.pot translation file from the parent theme into this folder.
- Next go to File -> New From POT/PO File and open the translation file from socialize-child/languages/socialize.pot.
- After translating the strings save your file. The filename should NOT prefixed with "socialize", so a Norwegian translation will be saved as nb_NO.po.
- PoEdit will create a .po and .mo file containing your translations. Upload these files to wp-content/themes/socialize-child/languages/.
Translating the plugin
Some of the theme text, such as WPBakery Page Builder elements is included in Socialize plugin.
- Go to socialize-theme/socialize/plugins/ and unzip the socialize-plugin.zip.
- Next go to File -> New From POT/PO File and open the translation file from socialize-theme/socialize/plugins/languages/socialize-plugin.pot.
- You will be asked to specify the language you want to translate to.
- Now click on each string and enter your translation in the text box.
- After translating the strings save your file. The filename should be prefixed with "socialize-plugin" followed by the country code, so a Norwegian translation will be saved as socialize-plugin-nb_NO.po.
- PoEdit will create a .po and .mo file containing your translations. Upload these files to wp-content/languages/plugins/.
6.2.2 Updating Your Translation
If you update the theme and new text needs to be translated you also need to update the language file as follows:
- For the theme insert your modified translation file (e.g. socialize-en_US.po) into the socialize-theme/socialize/languages/ folder.
- Now open this file in Poedit and click Update and it will display the text changes from the latest theme update.
- Upload your updated .po and .mo files to wp-content/languages/themes/.
- For the plugin insert your modified translation file (e.g. socialize-plugin-en_US.po) into the socialize-theme/socialize/plugins/socialize-plugin/languages/ folder.
- Now open this file in Poedit and click Update and it will display the text changes from the latest theme update.
- Upload your updated .po and .mo files to wp-content/languages/plugins/.
7.0 Advanced
7.1 Optimizing Page Speed
In order to improve the page load speed you will want to optimize your site. This is not something the theme alone can do as it would make editing the theme difficult for the customer and relies on your own site content.
We recommend you follow the steps provided by GTmetrix at http://gtmetrix.com/wordpress-optimization-guide.html.
7.2 SEO Optimization
The theme was created with the best SEO practice in mind, but to add greater SEO functionality we recommend you use the WordPress SEO by Yoast plugin.